Making your own Vagrant WordPress box
It had been a while since I’d played around with WordPress so I wanted to get it installed on my machine. Previously for me that would have involved downloading WordPress and setting it up in a local instance of Nginx running inside OS X, but these days I’m tending to run everything inside a virtual machine via Vagrant. Here are the steps to get that working.
Fetch WordPress
You can grab the WordPress package off their site, or you can clone the Git repository if you prefer. Either way, just make sure the files are extracted into a directory. I put mine in a directory called wordpress_test, so let’s use that as an example going forward.
Start with a custom base box
Rather than using Vagrant’s default Ubuntu box, I’m using a custom base box that has Nginx and MySQL pre-installed. This avoids having to wait ages for things to install when provisioning the WordPress box, and also means you can keep the config on this WordPress box much simpler.
I’ve put this base box on GitHub, and there are details in the README on how to clone the box and make it available. The gist is:
git clone git@github.com:paulherron/vagrant_precise32_nginx_mysql_php-fpm.git
cd vagrant_precise32_nginx_mysql_php-fpm
vagrant up
vagrant package --output precise32_nginx_mysql_php-fpm.box
vagrant box add precise32_nginx_mysql_php-fpm precise32_nginx_mysql_php-fpm.box
At this point, the box should be available to Vagrant under the name precise32_nginx_mysql_php-fpm precise32_nginx_mysql_php-fpm, and we’ll make reference to that in the next step!
Add a Vagrantfile inside your WordPress Directory
Alongside the WordPress files a Vagrantfile is needed to declare some basics about how the virtual machine should be set up. Create something like this at wordpress_test/Vagrantfile:
# -*- mode: ruby -*-
# vi: set ft=ruby :

# Vagrantfile API/syntax version. Don't touch unless you know what you're doing!
VAGRANTFILE_API_VERSION = "2"

Vagrant.configure(VAGRANTFILE_API_VERSION) do |config|
  config.vm.box = "precise32_nginx_mysql_php-fpm"

  # This line is optional, but useful if you'd already uploaded your custom base box to your own server.
  config.vm.box_url = "http://yoursite.com/boxes/precise32_nginx_mysql_php-fpm.box"

  config.vm.provision :shell, :path => "config/vagrant/bootstrap.sh"
  config.vm.network "private_network", ip: "192.168.50.2"
end
Notice that Vagrantfile calls a provisioning script, bootstrap.sh when it first boots the machine. Create that script at wordpress_test/config/vagrant/bootstrap.sh and put the following into it:
#!/usr/bin/env bash

cp /vagrant/config/vagrant/wp-config.php /vagrant

echo "Starting services…"
service php5-fpm restart
service nginx restart

mysql default -u root --password="100rows" < /vagrant/config/sql/database.sql
Notice the script intends to copy a config file, wordpress_test/config/vagrant/wp-config.php, into the WordPress root when the machine first boots. Open up wordpress_test/wp-config-sample.php as a template for this, edit the DB_NAME (set it to default), DB_USER (set it to root) and DB_PASSWORD (set it to 100rows) fields as appropriate and save the file at wordpress_test/config/vagrant/wp-config.php.
vagrant up
Now, we’re going to run Vagrant twice to get up and running. The first time we boot we’ll get the WordPress installer which will ask us to set up some initial stuff like the database and an admin user for the Wordpress admin panel.
vagrant up
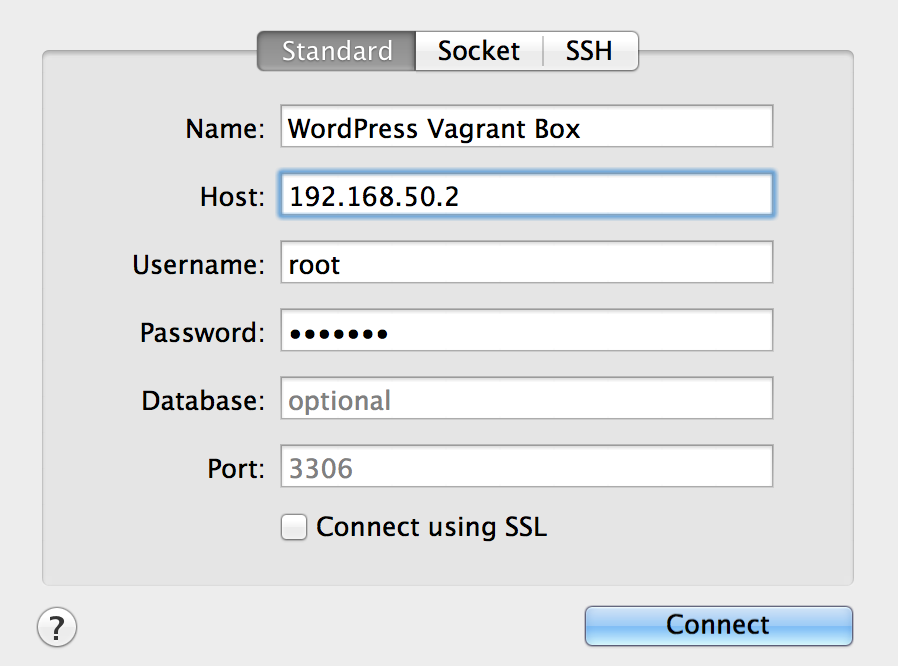
All being well you’ll be able to navigate to http://192.168.50.2/ and see the WordPress installer. Set things up as you like - you can even add some test content into your new blog if you like. Once you’re happy, we’ll dump the database to a static file so that next time we provision the box we don’t have to go through the install process all over again. You can do the database dump through the command line or via Sequel Pro using the above credentials, like so:
Export the database dump to wordpress_test/config/sql/database.sql, then let’s destroy the box so we can assure ourselves that everything will work as expected if ever we reprovision the box in future:
vagrant destroy
vagrant up
With a bit of luck everything will work like it did the first time, except this time the database will also be imported automatically.